Friday’s Tip – Using an Onscreen Button to Control your Simulation with Visual Logic
This week’s Friday Tip will show you how to create an on screen button that links to Visual Logic (VL), so that VL will run when YOU want to, not just when you have told SIMUL8 to.
To do this, first import a graphic file as a Background Image that you want to display the button; you will find this feature on the Insert Tab. We have included many example button images for you to use, and when you are prompted to insert the graphic, you can find a button graphic by navigating to C:\Program Files\SIMUL8\Examples\Images\Button
Once you have imported a button (or created your own and imported it), then you will need to name the button image. To do this, hold down CTRL and double click on the image. In the text box, give your button a name. Let’s use BUTTON1 for example.

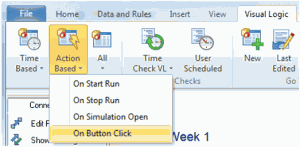
After that, you will need to set up the VL for the button. Navigate to the Visual Logic tab, select Action Based, and then select On Button Click.

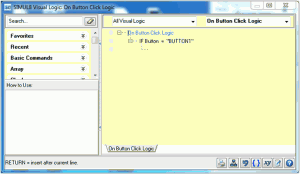
The VL editor will pop up. Here is what needs to be written to begin this feature:
IF button = “BUTTON1”

The BUTTON in quotes is what we had named our button. Please ensure that this is spelt exactly the way in the Visual Logic as it was on the button name. You may now place Visual Logic under the beginning statement, and whenever the button is clicked on the simulation screen, the Visual Logic will execute! How cool is that?!