Friday’s Tip-Referencing spread sheet values based on product type
 Sander / Oct 14, 2011
As promised last week we’ll be building up our simulation by adding a work center (WC) that will process the work items. Each work item has a unique operating time depending on the product type. Let’s get started by extending the simulation to the following structure:![]()
The next step will be to store the timing information in a spreadsheet. We will then use the spreadsheet to set the operating time in Work Center 1. To create a spreadsheet go to the data & rules tab on the ribbon, click on the drop down from the information store and create a new spreadsheet.
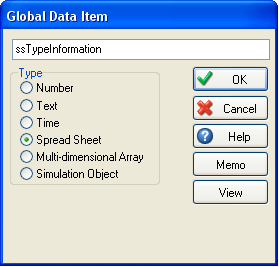
To edit the spreadsheet click on view or select the drop down from the spreadsheet button on the data & rules ribbon. Let’s make sure we have a proper layout of our spreadsheet, so click on the edit formats button:
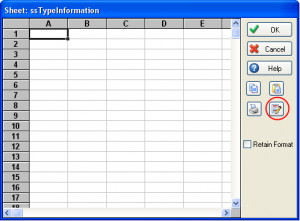
This screen allows you to make changes to the format of your spreadsheet. In this example we would like to change the headings of the columns. Column 1 will hold the product type and column 2 will hold the timing information. Double click on the heading to add sensible names to your spreadsheet and populate it with the following data: 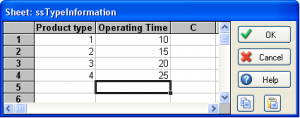
Confirm all changes and by clicking OK. The final step is to ensure that Work Center 1 will reference the right operating times depending on the product type. Please remember that we already have the product type stored in lblProductType. This label will hold a number 1,2,3 or 4. We can use this label to reference row 1,2,3 or 4 in the spreadsheet. Let’s see how. Select the WC and click in the operating time field. Now click on the button that shows three dots. This will open up the formula editor: 
The formula editor will allow you to reference the spreadsheet directly. Double click on the name of the spreadsheet (see center column): 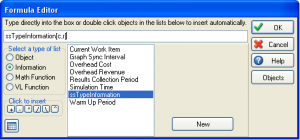
The name of the spreadsheet will now appear in the top field in the formula editor. You can see the syntax for spreadsheets between the brackets ([c,r]). The first value is the column, which is column 2 in our example. The second value is the row, which is not a fixed number, but can be referenced by lblProductType. Delete the ‘r’ and click on Object (left hand side of the window). Now double click on lblProductType and you should see the following: 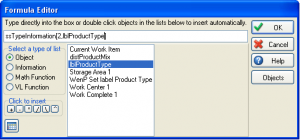
This will now reference the spreadsheet. It will reference column 2 and row lblProducttype (values between 1 and 4). Now confirm all changes and test whether your simulation is working.
Using spreadsheets is extremely efficient, because when you want to change operating times, you can now do that all in one location!
Stayed tuned, next week we’ll be adding revenue depending on the product type.