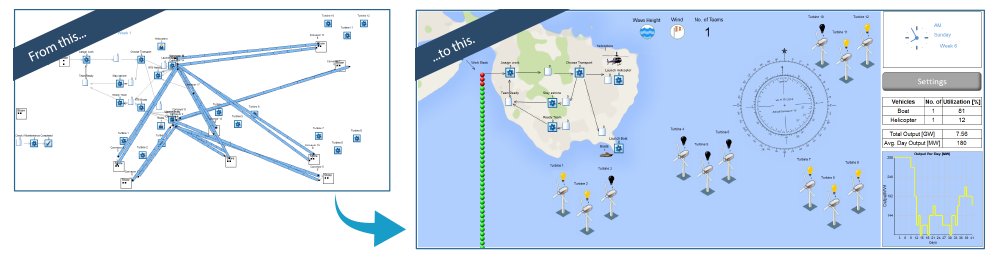
Simulation is a highly engaging approach for planning and improving processes. With SIMUL8’s powerful graphics and animation capabilities, you can fully showcase the impact of proposed changes to stakeholders and help drive buy-in for your projects.
What are some of the key features you should consider to create compelling and engaging simulations? SIMUL8 Corporation Consultant, Liam Hastie, outlines his five quick tips to maximize the impact of your simulations.
Tip 1: Hide Objects
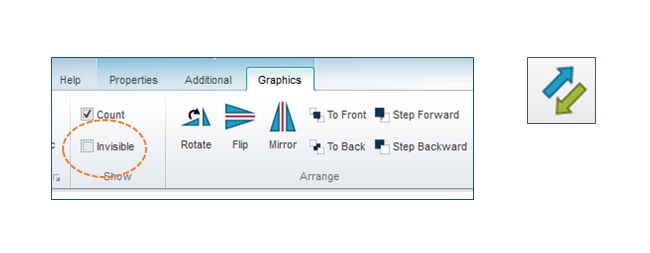
Less is more; avoid a cluttered screen by hiding objects that don’t need to be on display. Select an object, go to the ‘Graphics’ tab and tick the option ‘Invisible’.
In this example windfarm simulation above, the Conveyors and some of the detached processes have been hidden.
To toggle hidden objects, click on the double arrow symbol above the Menu Tabs (top and left-hand side of the screen).
Tip 2: Insert a Background Image
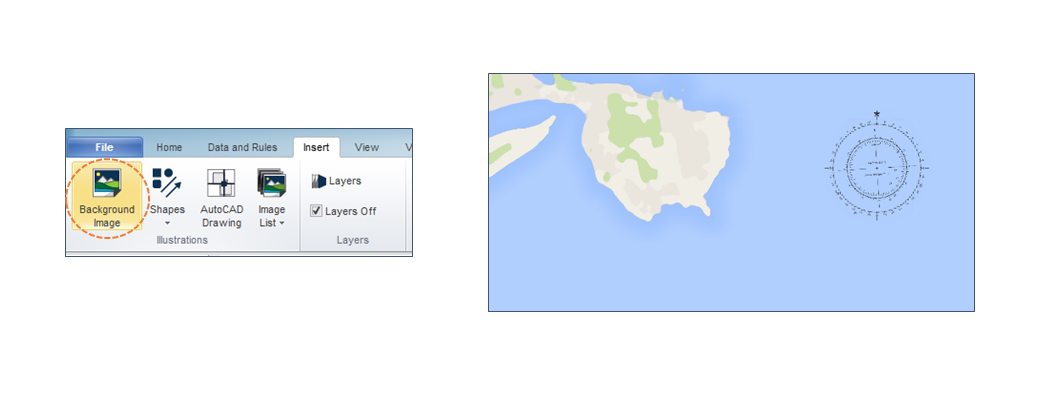
Adding a background image is a great way to quickly transform a simulation. By using an image, such as a floor plan, this can help orientate the user and make the simulation seem immediately familiar to them.
You can import a BMP, JPEG, DWG or DXF file by going to the ‘Insert’ tab, click on ‘Background Image’, then choose a location on the simulation workspace and left-click wherever you want the image to appear.
Once added, the image can be selected, re-sized, moved or deleted by left-clicking on the edges of the image.
Tip 3: Customize Object Graphics
To help further increase your users’ understanding of what’s happening in the simulation, you can change the appearance of any objects (Start Points, Queues, Activities, Resource, etc.) to better represent how these look in your actual system. For example, in our simulation we have changed some Resource objects to represent helicopters and boats.
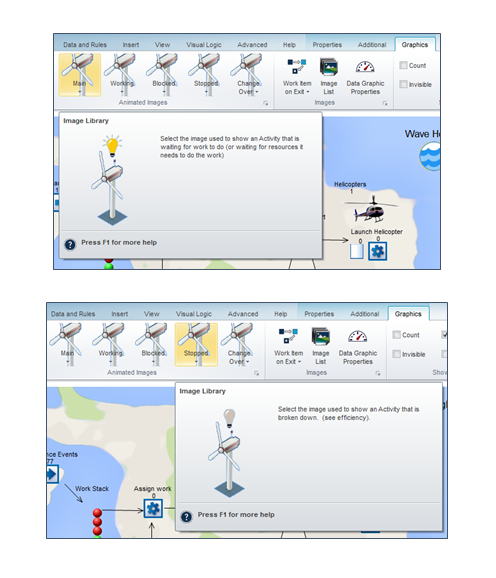
To do this, select a simulation object, open the ‘Graphics’ tab, and click on the option titled ‘Main’. This opens a window from where you can select recently used images or you can use the option further down the window ‘more images’ to open a collection of graphic folders that are installed with SIMUL8.
By selecting ‘more images’, you can also browse to the desktop or documents folder to use your own BMP or JPEG images for objects.
Activity objects are special and several images can be added to display when the activity is in a different state. In this example the ‘Main’ and ‘Working’ images show the turbine with an illuminated light bulb icon above; the ‘Stopped’ image shows the turbine with the light bulb off to indicate that power generation has stopped.
Get more SIMUL8 tips
If you’re a SIMUL8 user, visit our Support Portal for more resources and technical insight.
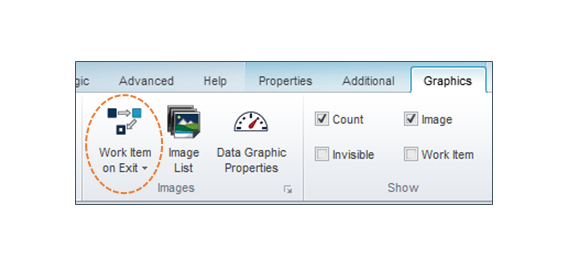
Tip 4: Set Work Item Images
When presenting a simulation, the Work Items being processed always receive focus from the audience. ‘Where are they going?’, ‘how do they describe the process?’ and ‘why are so many in that Queue?’; these are all typical questions to hear. Be sure to use this attention and put it to good work!
Control of the Work Item images can be achieved in a few ways. Most simply, the Work Item can be changed when exiting any Activity by selecting an Activity, opening the ‘Graphics’ tab, then choosing the option ‘Work Item on Exit’. The drop down works in the same way as the Object Graphic Window described above, and also includes the ‘more images’ options to access more folders of images or your own files (BMP or JPEG).
Learn about more advanced options for setting and changing Work Item images and how to do this using Visual Logic commands.
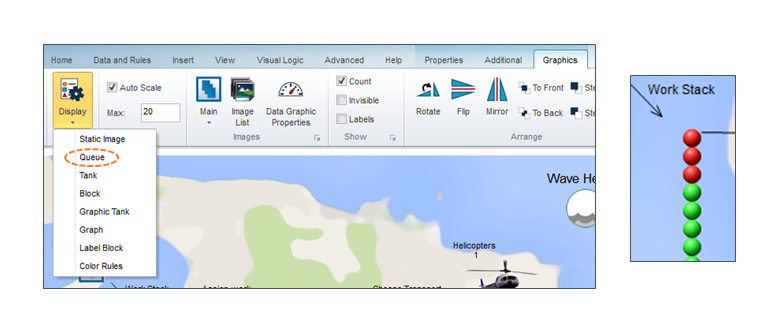
Tip 5: Change the Queue Display Style
Queues and their ability to highlight constraints and bottlenecks are a vital part of identifying improvements to a process; these aren’t just counter-productive from an output perspective, but they can have wider-ranging implications across your business. To help easily highlight these issues, SIMUL8 has a range of display styles for Queues.
To access the Display styles: select a Queue, open the ‘Graphics’ tab and then click on the ‘Display’ option to see a list of display styles. Selecting the style titled ‘Queue’ displays all of the Work Items in the Queue on screen.
The orientation and spacing of the Work Items can be edited by selecting the Queue and then clicking on the double arrow symbol at the top of the SIMUL8 Window. Two black markers will appear in the Queue object; dragging the marker on the left will adjust the Work Items (tip: it’s easier to do this when there are already some Work Items in the queue, so it’s better to set this up during a simulation run rather than at reset).
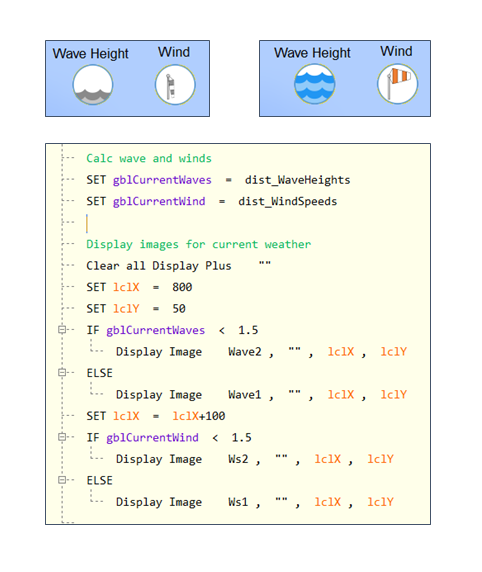
Bonus Tip (for Advanced Users): Control Images with Display+ Visual Logic
Where more direct control of graphics is needed, or where additional animation will help the simulation make an impression, advanced tools are available in SIMUL8. In this example, I have used some Display+ Visual Logic commands to update images at specific locations onscreen (set as an X, Y coordinate that is a count of pixels from the upper left corner of the simulation workspace).
When the wave height and/or wind speed are over a certain level, this will trigger a change to the corresponding image to let the viewer see if the current day in the simulation will be influenced by weather. This drives decision-making whether to use a helicopter as an alternative to the boat, or to stay ashore.
The Visual Logic section here shows how this is managed so that the wave height icon appears at position 800, 50 and the wind icon appears 100 pixels to the right of that at 900, 50.
About the author

Liam Hastie
Liam Hastie is a Specialist Consultant at SIMUL8 Corporation providing insight, support and skills to help you get the most from process simulation. With a Masters in Industrial Design Engineering and over 10 years’ experience in Lean Six Sigma Process Improvement, Liam offers unique perspective on how to use simulation to boost your process improvement projects and transform your decision making.